Powertex Step by Step Tutorial
By Donna Mcghie Powertex Trainer and Tutor
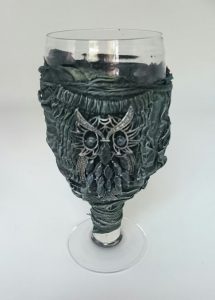
Follow these simple steps to create your own unique wine glass
I have been asked to do some blogs that are simple to follow for people who want to create Powertex projects from home.
Everything in these basic blogs is readily available. You do not have to use the exact embellishments I use as I tend to pick up bits and pieces from charity shops and take home to stash. I’m sure if you are a crafter you will have a similar stash of goodies just waiting to be utilised.
If you don’t already have Powertex at home then it is readily available to order from Powertex Uk However if you are local to the Southampton area and just want a starter kit to experiment with, just let me know, and if at all possible I can drop one round for you.
Materials List

You can use the most basic materials to create something beautiful
- A Glass
- Powertex Fabric Hardener
- Powertex Easy Varnish
- Powertex Pigments
- Flat Brush
- Gloves
- A Small Piece of Natural Fabric (such as cotton)
- Embellishments of your choice (I chose an owl from an old necklace, and some string)
STEP 1
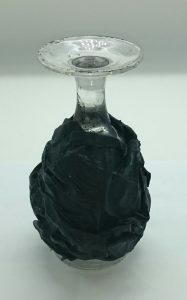
A good tip at this stage is to work on the glass upside down
Decant some Powertex Fabric Hardener into a tub. Only pour out what you think you will need as it is not recommended to pour the hardener back into the original bottle. If you do pour out too much (as I often do) don’t worry, just ensure that you put the lid on the tub and it will be fine for around 5 days.
Now don your gloves (this can get messy) and soak your material in the Powertex. Be sure to work the Powertex in well with your fingers so that the material is completely covered, but not soaking wet.
Wrap the wet material round the glass. I find it easier to work with the glass upside down at this point as gravity tends to pull the material downwards until it dries a bit.
You want to create lots of textures and creases in the material now, as this is what gives such a good effect when the material has hardened.
If the material insists on sliding off, I find a good tip is to wrap a very thin section round the glass with no textures, and then put another bit on top as it will now have something to cling to when you start to manipulate it into interesting shapes.
STEP 2

I added my owl and some string for embellishment, use whatever takes your fancy
After a while you will find that the material stays put.
At this point I turn the glass the right way up and add my embellishments. I love to use string in my designs as it is such a cheap resource, and gives a lovely effect once dry brushed at the end.
STEP 3

Cling film can come in useful at this stage
Put it aside somewhere safe to dry. If your embellishments are not playing ball and sliding off, a good tip is to keep them in place with some cling film.
Ideally I let my project dry overnight, but if you are in a rush you can speed up the process using a cool setting on a hair dryer.
STEP 4

Now it is starting to come together
Once the material feels hard you are safe to go ahead and add some colour. Dry brushing is a wonderful technique and you can see a very short video of how it works in my previous blog here
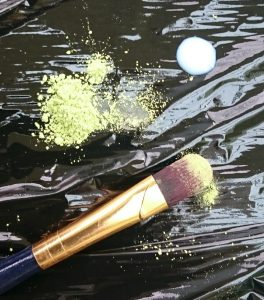
The smallest amount of pigment will go a long way
Pour out a small amount of Powertex Easy Varnish and Pigment.
Dip a flat brush into the varnish, then into the pigment. Now wipe the brush off on a paper towel until it is almost dry. Once you have done this, you need to very gently sweep the brush over the textures on your project.
My best tip is to build up the depth of colour you want very gradually, rather than putting too much on at once.
Keep on building up the colour gradually.
If you want to add different colours as well. I chose Lime Green, Green Ginger and Silver for my design, but check out the Powertex website, there are loads of colours to choose from.
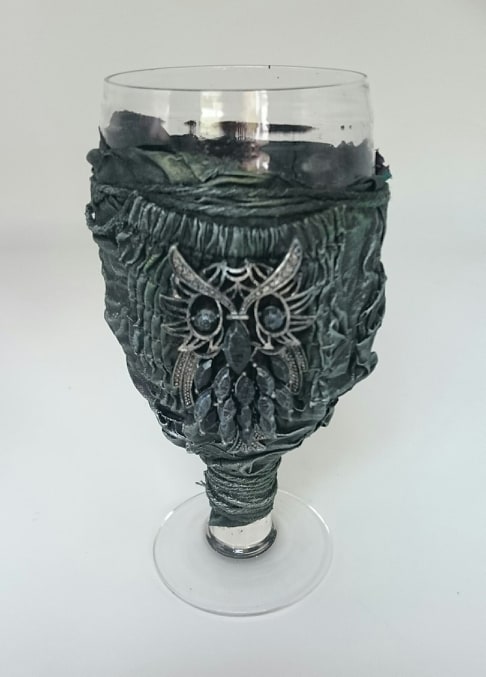
Ta Da!! your finished glass
MY FINAL TIPS
And that’s it folks. I would say the trickiest part of this project is the initial wrapping the material round the glass. Chances are it will try and slide off. If this happens use the tip of turning the glass upside down.
Although Powertex is water resistant (after three months curing time) please don’t put it in the dishwasher. Give it three months to completely harden, and a very gentle handwash is recommended.
As always, I would love it if you share any designs this blog has inspired you to make. If you care to share then please feel free to photos on my facebook page
I hope this has been a helpful blog. Stay safe and well everyone and hope to see you again soon.
Donna