SIMPLE POWERTEX PROJECT TO DO AT HOME
by Donna Mcghie (Powertex Trainer and Tutor)

You really don’t need much to transform a plain journal into something stunning like the one below

follow these simple step by step instructions to create a unique journal cover
I’ve had a request to do some simple step by step blogs. These are designed so that people can follow at home whilst they are self isolating or social distancing.
I am planning on doing a series of these. So if there is anything you would particularly like please do comment below and I will do my very best to get one done for you. Please note, I am deliberately keeping these simple and they are designed for you to use bits and pieces from your creativity stashes to keep going out to a minimum.
Thanks to Covid 19 these are without a doubt going to be challenging times for us. As a firm believer in the benefits of creativity for our mental health well being I plan to make the best use of this enforced time out that I can.
Materials List: (this project is designed to be adapted to use whatever you have in your creativity stash)
- Black Powertex Fabric Hardener
- Powertex Easy Varnish
- Powertex Pigments
- Journal
- ClingFilm
- Flat Brush
- Scrap of Material (Natural Fibre such as Cotton)
- Flat Brush
- Rubber Gloves
- Masking Tape
Please note all Powertex Products can be purchased online at www.powertex.co.uk
STEP 1

it’s good to have a rough plan in mind for your design (although mine always changes along the way)
Lay out your embellishments on the journal cover so that you have a rough idea of what you want to achieve. My design always changes shape along the way. However I know some people like to take a photo at this stage to refer back to.
I have simply used an old mdf rectangle (I think it used to frame some snip art things, its been hanging around for ages.
I bought the bee ages ago because Iiked the bee positive message on its wings). If you like the bee idea there are some lovely bee molds on the Powertex website.
STEP 2
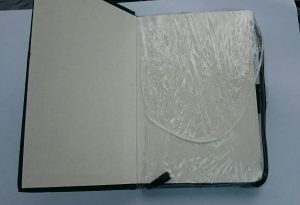
This will stop the inside pages from getting messy
I like to clingfilm the inside of the pages of the journal to stop them getting messy with Powertex.
If you can’t get hold of clingfilm just be imaginative, you could use paper bags or bin liners, where there’s a will there’s a way.
STEP 3

Masking tape comes in useful to protect the spine
I also like to put a strip of masking tape down the spine to protect this area.
This is especially useful if your journal is one with the wire binding as the powertex could drip through the holes.
STEP 4
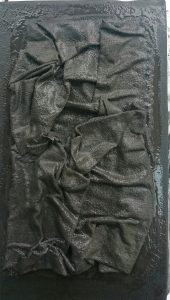
Now we get to the fun part!
Now we can get messy! Wearing gloves (if you want) soak your material in some Powertex. I have used black Powertex because it matches the journal. However you can use any colour you like.
Make sure that the material is competely soaked, but not dripping wet or it will take ages to dry. Once it is covered with Powertex, place it on the cover of your journal. Now either using your fingers, or a tool such as a skewer manipulate lots of little creases and textures into it.
The more textures you can get the better your end result will be.
STEP 5

Some embellishments I like to paint with Powertex, others I leave clear
Now you can gently press your embellishments on top of the material.
I like to paint some with Powertex, like the frame, and leave others clear, like the bee.
As you can see I changed the position of the bee, and I also added some lace textures to a couple of the corners.
STEP 6
Now onto my favourite part of any project – dry brushing. It can take a while to get the knack of this. Do persevere though because once you get it you will love it!
Dip a flat brush into a tiny bit of Powertex Easy Varnish, and then into the pigment colour of your choice.
Now the counter intuitive part, wipe it off on a bit of paper towel.
Again, if paper towel is not available (we are living in strange times) then use an old towel, or an old piece of cloth.
Now very gently, sweep the brush over the top of the textures on your project. The best tip I can give is to start off very very lightly, and gradually build up to the depth of colour that you want.
Remember, you are simply sweeping over the top. You are aiming to highlight the textures, not get into every nook and cranny.
STEP 7
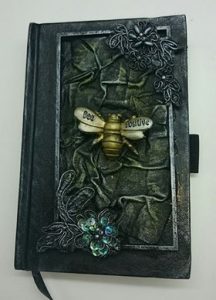
Ta Da!! your finished journal
The final step is to gently remove both the cling film and the masking tape.
I always think removing the masking tape is the equivalent to putting a mount around a painting. It really cleans the whole thing up and brings it together.
I hope you are inspired by this blog. My style of blogging is to give ideas, not exact instructions as I love people to use their imaginations and come up with designs that are unique to them.
If you do decide to make a journal, I would love to see photos of it. You are welcome to post them on my facebook page and if you fancy giving a little shout out about this blog I will love you forever.
If you are looking for more inspiration you can always check out previous blogs, including this one here which shows how to bling up a bottle.
I really hope that everyone is keeping as safe and well as you can be in these strange and challenging times. Be kind to each other, keep being creative and I hope to see you very soon.
Donna 🙂